本地Tomcat服务器接收android端上传的数据

大体描述

android端提交账号和密码,Tomcat服务器端会接收到,eclipse的控制台输出得到的账号和密码。

Tomcat服务器端

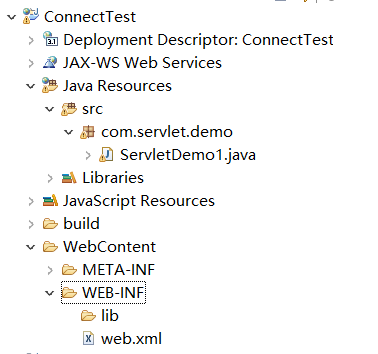
先建立了一个javaweb项目,我这项目名是ConnectTest,然后在建立了一个包,在这个包下建立了一个servlet文件,我这命名为ServletDemo1。建立完servlet文件后,千万不要忘记在web.xml中注册,下面我将贴一下具体代码实现和项目结构。

项目结构

超级简单:

ServletDemo1.java
1
2
3
4
5
6
7
8
9
10
11
12
13
14
15
16
17
18
19
20
21
22
23
24
25
26
27
28
29
30
31
package com.servlet.demo;

import java.io.IOException;

import javax.servlet.ServletException;
import javax.servlet.annotation.WebServlet;
import javax.servlet.http.HttpServlet;
import javax.servlet.http.HttpServletRequest;
import javax.servlet.http.HttpServletResponse;

public class ServletDemo1 extends HttpServlet {
private static final long serialVersionUID = 1L;

public ServletDemo1() {
super();
}

protected void doGet(HttpServletRequest request, HttpServletResponse response)
throws ServletException, IOException {
doPost(request, response);
}

protected void doPost(HttpServletRequest request, HttpServletResponse response)
throws ServletException, IOException {
// 获取请求的数据,并向控制台输出
String username = request.getParameter("username");
String password = request.getParameter("password");
System.out.println("-----> doPost username:" + username + " password:" + password);
}

}
web.xml

也很简单就是对上面的那个servlet进行注册:

1
2
3
4
5
6
7
8
9
10
11
12
13
14
15
16
17
18
19
20
21
<?xml version="1.0" encoding="UTF-8"?>
<web-app xmlns:xsi="http://www.w3.org/2001/XMLSchema-instance" xmlns="http://xmlns.jcp.org/xml/ns/javaee" xsi:schemaLocation="http://xmlns.jcp.org/xml/ns/javaee http://xmlns.jcp.org/xml/ns/javaee/web-app_3_1.xsd" id="WebApp_ID" version="3.1">
<display-name>ConnectTest</display-name>
<welcome-file-list>
<welcome-file>index.html</welcome-file>
<welcome-file>index.htm</welcome-file>
<welcome-file>index.jsp</welcome-file>
<welcome-file>default.html</welcome-file>
<welcome-file>default.htm</welcome-file>
<welcome-file>default.jsp</welcome-file>
</welcome-file-list>

<servlet>
<servlet-name>ServletDemo1</servlet-name>
<servlet-class>com.servlet.demo.ServletDemo1</servlet-class>
</servlet>
<servlet-mapping>
<servlet-name>ServletDemo1</servlet-name>
<url-pattern>/ServletDemo1</url-pattern>
</servlet-mapping>
</web-app>

android端

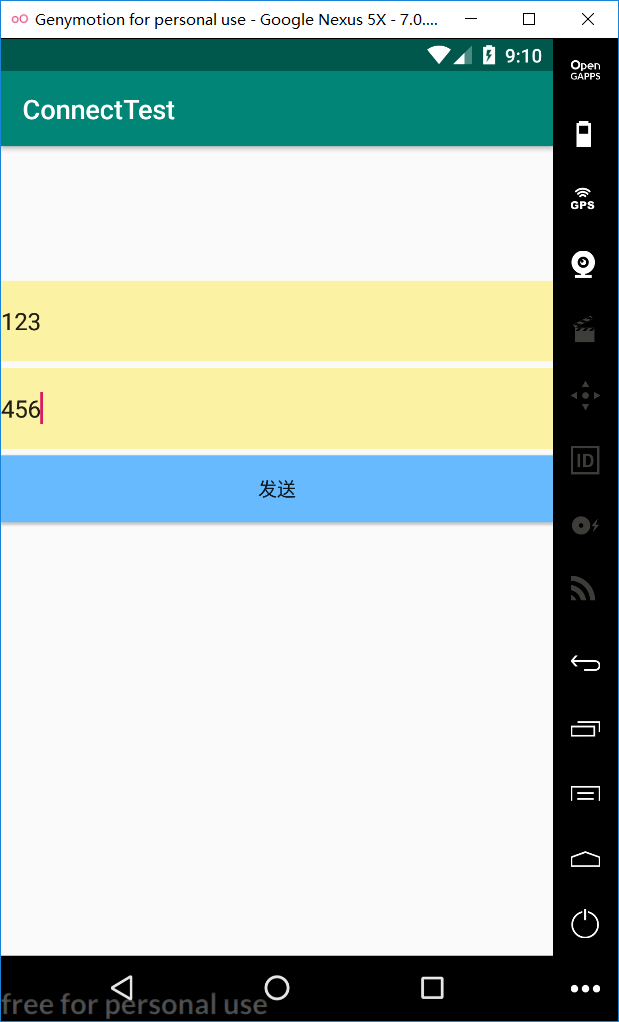
因为只是一个简单的例子,所以页面很简单,两个输入框,一个输入账号,一个输入密码,点击发送按钮后,账号和密码会提交到Tomcat服务器端,所以eclipse这边的Tomcat服务器控制台会输出账号和密码。

界面

项目结构

这里只贴上java代码实现部分的结构,布局部分的默认就行:

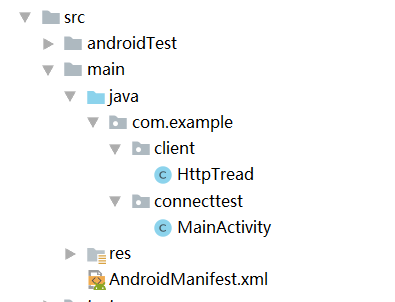
可以看到建了两个包,一个client是存放线程类的,另外一个主界面类。

HttpThread.java
1
2
3
4
5
6
7
8
9
10
11
12
13
14
15
16
17
18
19
20
21
22
23
24
25
26
27
28
29
30
31
32
33
34
35
36
37
38
39
40
41
42
43
44
45
46
47
48
package com.example.client;

import android.util.Log;

import java.io.IOException;
import java.net.HttpURLConnection;
import java.net.MalformedURLException;
import java.net.URL;

public class HttpThread extends Thread {
private String url;
private String username;
private String password;

public HttpThread(String url, String username, String password){
this.url=url;
this.username=username;
this.password=password;
}

public void send() throws IOException {
//将username和password传给Tomcat服务器
url=url+"?username="+username+"&password="+password;
try {
Log.i("测试", "start"); //Log.i我用来测试调试的。
URL httpUrl=new URL(url);
//获取网络连接
HttpURLConnection coon=(HttpURLConnection)httpUrl.openConnection();
//设置请求方法为Post
coon.setRequestMethod("POST");
//设置访问超时时间
coon.setReadTimeout(5000);
//调用getInputStream方法后,服务端才会收到请求,并阻塞式地接收服务端返回的数据
coon.getInputStream();

} catch (MalformedURLException e) {
e.printStackTrace();
}
}
public void run(){
super.run();
try {
send();
}catch (IOException e){
e.printStackTrace();
}
}
}
MainActivity.java:
1
2
3
4
5
6
7
8
9
10
11
12
13
14
15
16
17
18
19
20
21
22
23
24
25
26
27
28
29
30
31
32
33
34
35
36
37
38
package com.example.connecttest;

import android.support.v7.app.AppCompatActivity;
import android.os.Bundle;
import android.util.Log;
import android.view.View;
import android.widget.Button;
import android.widget.EditText;
import android.widget.Toast;

import com.example.client.HttpThread;

public class MainActivity extends AppCompatActivity {
private EditText username;
private EditText password;
private Button signup;
@Override
protected void onCreate(Bundle savedInstanceState) {
super.onCreate(savedInstanceState);
setContentView(R.layout.activity_main);
username=(EditText)findViewById(R.id.account);
password=(EditText)findViewById(R.id.password);
signup=(Button)findViewById(R.id.btnSign);
signup.setOnClickListener(new View.OnClickListener() {
@Override
public void onClick(View v) {
Log.i("1111", "1111111");
onLogin();
Toast.makeText(MainActivity.this,"success",Toast.LENGTH_SHORT).show();
}
});
}

private void onLogin() {
String url="http://192.168.2.133:8080/ConnectTest/ServletDemo1";
new HttpThread(url,username.getText().toString().trim(),password.getText().toString().trim()).start();
}
}
AndroidManifest.xml
1
2
3
4
5
6
7
8
9
10
11
12
13
14
15
16
17
18
19
20
21
22
<?xml version="1.0" encoding="utf-8"?>
<manifest xmlns:android="http://schemas.android.com/apk/res/android"
package="com.example.connecttest">
<!-- 申请权限-->
<uses-permission android:name="android.permission.INTERNET" />
<application
android:allowBackup="true"
android:icon="@mipmap/ic_launcher"
android:label="@string/app_name"
android:roundIcon="@mipmap/ic_launcher_round"
android:supportsRtl="true"
android:theme="@style/AppTheme">
<activity android:name=".MainActivity">
<intent-filter>
<action android:name="android.intent.action.MAIN" />

<category android:name="android.intent.category.LAUNCHER" />
</intent-filter>
</activity>
</application>

</manifest>
布局 activity_main.xml
1
2
3
4
5
6
7
8
9
10
11
12
13
14
15
16
17
18
19
20
21
22
23
24
25
26
27
28
29
30
31
<?xml version="1.0" encoding="utf-8"?>
<LinearLayout xmlns:android="http://schemas.android.com/apk/res/android"
xmlns:app="http://schemas.android.com/apk/res-auto"
xmlns:tools="http://schemas.android.com/tools"
android:layout_width="match_parent"
android:layout_height="match_parent"
android:orientation="vertical"
tools:context=".MainActivity">

<EditText
android:layout_marginTop="100dp"
android:id="@+id/account"
android:layout_width="match_parent"
android:layout_height="60dp"
android:text="请输入账号:"
android:background="#FCF2A4"/>
<EditText
android:layout_marginTop="5dp"
android:id="@+id/password"
android:layout_width="match_parent"
android:layout_height="60dp"
android:text="请输入密码:"
android:background="#FCF2A4"/>
<Button
android:layout_marginTop="5dp"
android:id="@+id/btnSign"
android:layout_width="match_parent"
android:layout_height="50dp"
android:text="发送"
android:background="#67BAFD"/>
</LinearLayout>
效果

eclipse端输出:

0%